 (Image via
Your vehicle's transmission is a complex system that relies heavily on fluid to function smoothly. Neglecting this vital fluid can lead to jerky shifting, strange noises, and eventually, expensive repairs. Many drivers feel intimidated by the idea of checking under the hood, but monitoring your transmission fluid is a straightforward process that anyone can master. This guide empowers you to perform this essential check cleanly and confidently, saving you trips to the mechanic. We will walk you through the preparation, the checking process, and how to interpret what you see. Regular maintenance like this extends the life of your car and gives you peace of mind on every drive. Let’s demystify this task together.
Understanding the Role of Transmission Fluid
Before we dive into the "how-to," it is helpful to understand the "why." Transmission fluid serves multiple critical purposes. It acts as a hydraulic fluid, enabling the gear shifts in an automatic transmission. It also cools the transmission by carrying heat away from moving parts and lubricates gears to prevent wear and tear.
When fluid levels drop too low, the transmission cannot generate enough hydraulic pressure to engage gears properly. This often results in "slipping," where the engine revs up but the car doesn't accelerate as expected. On the other hand, fluid that is old or burnt loses its ability to lubricate and cool, leading to overheating and internal damage. By keeping an eye on this fluid, you are actively protecting one of the most expensive components of your vehicle.
Preparing Your Vehicle for a Clean Check
Preparation is the key to a mess-free experience. Unlike checking engine oil, which you often do when the engine is cold, most manufacturers recommend checking automatic transmission fluid while the engine is running and warm. This is because the fluid expands when heated, and checking it cold could give you a false "low" reading.
Safety First: Setting the Stage
Park your vehicle on a flat, level surface. This is crucial for an accurate reading. Engage the parking brake firmly to ensure the car does not roll. Start the engine and let it idle for a few minutes until it reaches its normal operating temperature.
While the engine is warming up, gather your supplies. You will need a clean, lint-free white rag or paper towel. White is best because it allows you to see the color of the fluid clearly. Avoid using dirty or oily rags, as introducing even a tiny amount of dirt into the transmission can cause problems. You might also want a pair of disposable gloves to keep your hands clean.
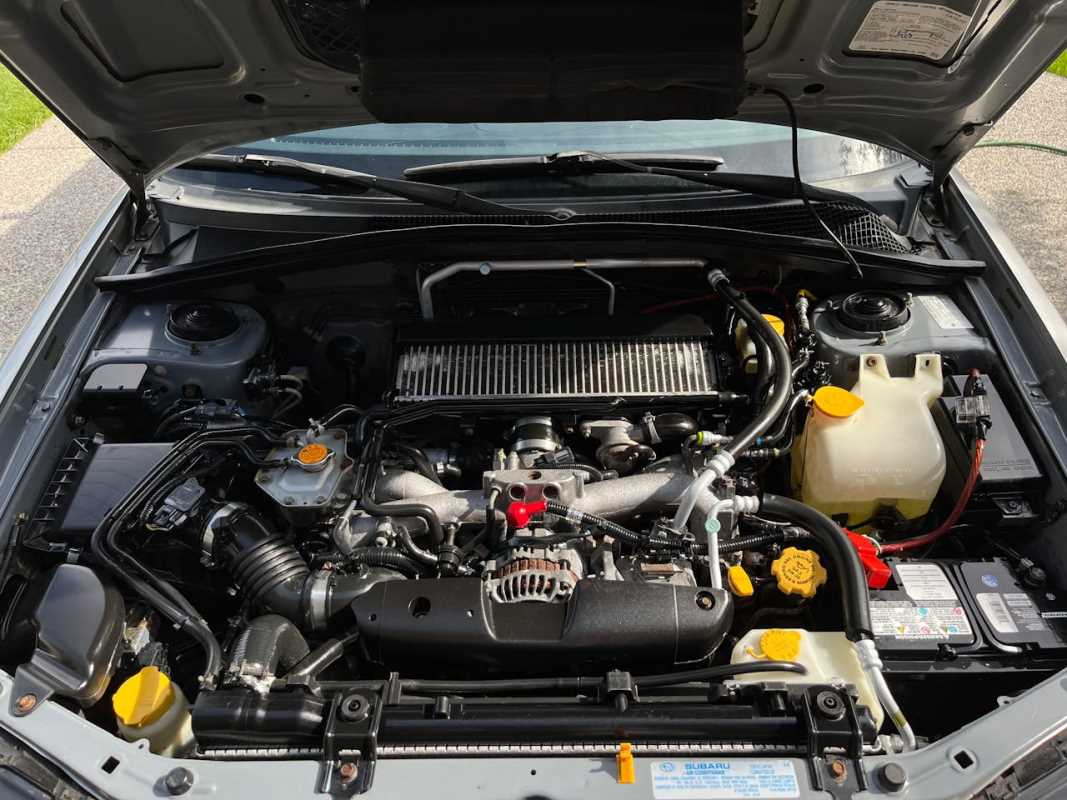
Locating the Dipstick
Open the hood and secure it with the prop rod. In rear-wheel-drive vehicles, the transmission dipstick is usually located near the back of the engine bay, on the passenger side. In front-wheel-drive vehicles, it is often on the driver’s side, lower down near the transmission itself.
The handle is typically brightly colored—often red or yellow—and may have a transmission symbol or text indicating "Trans Fluid." Be careful not to confuse it with the engine oil dipstick. If you are unsure, consult your owner’s manual for the exact location. Note that some modern cars have "sealed" transmissions without a dipstick. If you cannot find one and your manual confirms this, checking the fluid requires a professional mechanic.
The Step-by-Step Checking Process
Once your car is warm and you have located the dipstick, you are ready to proceed. Follow these steps carefully to ensure an accurate reading without spilling a drop.
- Cycle the Gears: With the engine still running and your foot firmly on the brake pedal, slowly move the gear selector through each position (Park, Reverse, Neutral, Drive) and back to Park. Pause for a few seconds in each gear. This circulates the fluid through all the hydraulic circuits, ensuring the level you see on the dipstick is accurate.
- Pull and Wipe: Locate the dipstick loop. Pull it straight out of the tube. Do not try to read the level yet. The splashing from the engine running will make the first reading inaccurate. Instead, use your clean white rag to wipe the dipstick dry from the handle down to the tip. This step removes any splash marks.
- Reinsert Fully: Push the clean dipstick back into the tube. Make sure you push it all the way down until it seats fully. If you don't insert it completely, your reading will show the level as lower than it actually is.
- The Accurate Read: Pull the dipstick out again, keeping it level. Do not tip it downward or upward, as the fluid might run and distort the reading. Look at the end of the stick. You will see markings indicating "Full" and "Add," or sometimes "Hot" and "Cold." Since your engine is warm, you should look at the "Hot" range. The fluid should fall between the two marks in this section.
Interpreting the Fluid Condition
Checking the level is only half the battle. The condition of the fluid tells you a story about the health of your transmission. As you wipe the dipstick on your white rag, take a close look at the stain it leaves behind.
The Color Test
Healthy automatic transmission fluid is typically a bright, translucent red. This dye is added specifically to distinguish it from engine oil.
- Bright Red: The fluid is in excellent condition.
- Dark Red or Brown: The fluid is getting older but may still be functional. It is a sign that you should plan for a fluid change soon.
- Black or Very Dark Brown: This indicates the fluid is burnt and has lost its protective qualities. This is often accompanied by a burnt toast smell. If you see this, your transmission needs immediate service.
- Milky or Pinkish: This is a serious warning sign. It usually means coolant (antifreeze) has mixed with the transmission fluid, often due to a leak in the radiator. This mixture destroys transmission clutches rapidly. Do not drive the car; seek professional help immediately.
The Smell and Feel Test
Give the fluid on the rag a quick sniff. It should have a mild, petroleum-like odor. If it smells like burnt toast or rotten eggs, the transmission is overheating or components are burning up inside.
Rub a little fluid between your thumb and forefinger. It should feel smooth and oily. If it feels gritty or you can see small metal specks in it, this indicates internal parts are wearing down and grinding against each other.
Adding Fluid Cleanly (If Needed)
If your reading was below the "Add" or "Low" mark, you need to add fluid. This is the step where messes usually happen, but with a steady hand and the right tool, you can keep things tidy.
Choosing the Right Fluid
Never grab just any bottle of transmission fluid off the shelf. Transmissions are incredibly sensitive to the specific chemical friction modifiers in the fluid. Using the wrong type (e.g., using Type F in a car that requires Mercon V) can cause slipping, shuddering, and permanent damage. Check your owner’s manual for the exact specification your car requires.
The Funnel Technique
You add fluid directly through the same tube where the dipstick sits. Because this tube is narrow, pouring directly from the bottle is a recipe for a spill. Use a long-neck funnel specifically designed for transmissions. The long neck ensures the funnel sits deep in the tube and won't tip over.
- Add in Small Amounts: Do not pour a whole quart in at once. Transmission fluid expands, and it is very easy to overfill. Start with just a quarter or half a quart.
- Recheck Often: After adding a small amount, wait a minute for the fluid to drain down the tube. Then, repeat the checking process (Pull, Wipe, Reinsert, Read).
- Stop at "Full": Once the level hits the "Full" mark in the "Hot" zone, stop immediately. Overfilling can be just as bad as underfilling, as it causes the fluid to foam and lose its hydraulic properties.
Maintaining a Clean Engine Bay
Even with the best care, a drip might happen. Keep your rag handy to catch the dipstick tip as you pull it out. If a drop hits the hot engine or exhaust manifold, it can smoke and smell bad. Wipe any spills immediately.
By regularly performing this simple check—perhaps every time you change your oil—you are taking a proactive stance on vehicle maintenance. You are familiarizing yourself with your car's normal operating state, which makes it much easier to spot when something goes wrong. It is a small investment of time that pays dividends in vehicle longevity and reliability. We hope this guide helps you feel more capable and confident under the hood.